Jenkins integration with Bitbucket for Selenium project
Table of Contents

In my previous article, I explained how to integrate Allure reports in a Selenium project. In this article, I would be explaining the integration of Jenkins with Bitbucket for a Selenium project.
Introduction to Jenkins #
Jenkins is an open-source automation tool written in Java that includes plugins for Continuous Integration. It enables you to automate the execution of a series of actions to achieve the Continuous Integration (CI) process. Jenkins is used to build and test your software projects continuously, making it easier for developers to incorporate changes to the project and for users to leverage a fresh build. To achieve this, we have to integrate it with any source code repository.
Purpose: #
This article targets mainly QA professionals who focus on automating the execution of Selenium scripts whenever a Bitbucket repo is modified. The Bitbucket repo will be connected to Jenkins via its in-built webhook functionality, and whenever the code changes, it would trigger a new Jenkins job.
The automation code base which I have used for testing this is Selenium + Java + Maven + Allure Reporting which is uploaded on the public servers of Bitbucket Repository Link. For other cases, it can be hosted internally on the respective organization’s domain.
For our current setup, since the code is hosted on Bitbucket’s public servers, our Jenkins servers need to be reachable by Bitbucket’s server - hence a public IP is required in this case. For another case where the code is hosted internally at the organizational level, both these servers should be able to communicate with each other on their respective ports.
I have installed Jenkins on my home-based server on port 8080 and allowed access through my router’s firewall for this particular duo of server and port number. This would allow Bitbucket to access Jenkin’s webhook on my server.
For what purpose are we going to consume Jenkins CI for our Selenium automation project?
These are the most common scenarios:
Scenario 1 #
There are times when the development team releases the build late at night and it is not feasible for the QA team to keep a run so late. So, we can achieve this nightly run with the help of Jenkins and the respective code repository.
Developers mostly use GitLab, GitHub, or BitBucket as a version control system (VCS). Our aim is to achieve an automatic job run on Jenkins, whenever the developer pushes a new code to the SVN repository.
Scenario 2 #
Here, you do not want to consume the developer’s code and you just want to run an automatic suite on Jenkins, as and when you push an update on your source code repository (in this case whenever a new update is pushed on your Bitbucket’s Selenium automation code repository).
You must have experienced that whenever you run your automation suite and if there are script errors - you need to fix the errors, upload the automation code to your server and then run the automation suite. Similarly, for code on local systems also you would need to run the automation suite again after fixing those errors. For avoiding this we can integrate Bitbucket (or any other VCS) with Jenkins which would automatically run the suite whenever it spots a code change in the SVN repository.
Jenkins installation on windows #
I have already covered how to install Jenkins in Ubuntu. In this article, I am going to explain Jenkins’s installation on Windows and then integrate it with the Bitbucket project.
-
Go to the Jenkins official website having permalink https://updates.jenkins-ci.org/download/war/ to download the latest Jenkins war file.
-
Move it to a separate folder instead of Downloads (recommendation, not mandatory)
-
Go to the folder where the Jenkins war file is placed. In my case, it is a folder named Jenkins in D drive. Open the command prompt at that location and type
java -jar jenkins.war
Jenkins installation will start and an admin password will be displayed at the console.
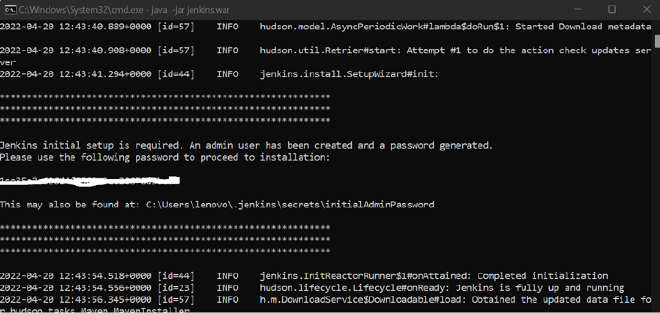
Jenkins by default runs on 8080 in the local machine. Go to browser and type “localhost:8080”, press enter. “Unlock Jenkins” screen will appear.
-
Paste the password generated in the console and proceed. Click on “Install Suggested Plugins” and Jenkins will download all the basic configuration files. Make sure you are connected to the Internet and this may take some time depending on your bandwidth.
-
Registration screen appears, enter all the required details and click Save and continue.
-
Default Jenkins URL would be http://localhost:8080/. Click on “Save and Finish”. Click on “Start using Jenkins”. Jenkins home screen appears.
-
Download all the required plugins and configure them under Jenkin’s Global Tool Configuration. Refer to the below steps to achieve that.
Download required plugins #
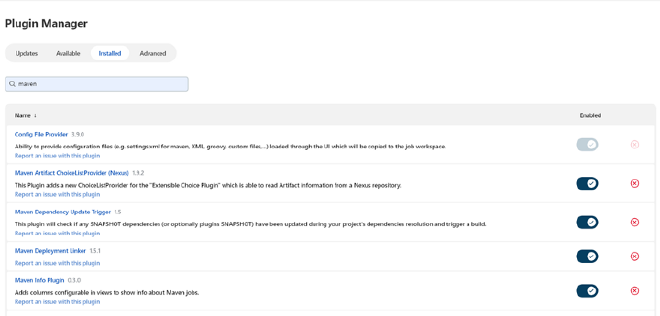
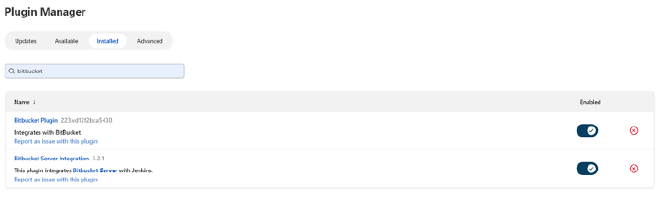
Now, the Selenium automation project which we want to integrate is a Maven project and I have used Allure reports as a reporting tool that is uploaded on the Bitbucket server. So, we need to download Maven, Allure, and Bitbucket plugins.
- Click on Manage Jenkins-> Manage Plug-Ins. Click on the “Available” tab and search “maven”. Check all the plugins which have maven in their title and click on any one of the buttons “Install without restart” or “Download now and install after restart”
I have already installed so it is available under the “Installed” tab.
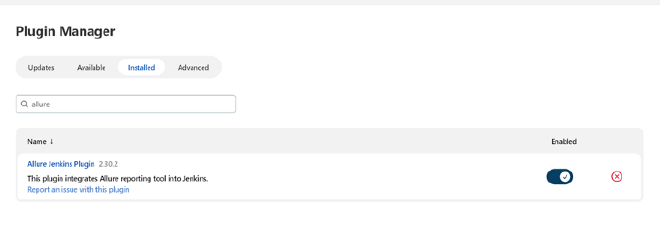
- Similarly, search “Allure” and “Bitbucket” and download plugins in Jenkins.
Global Configurations in Jenkins #
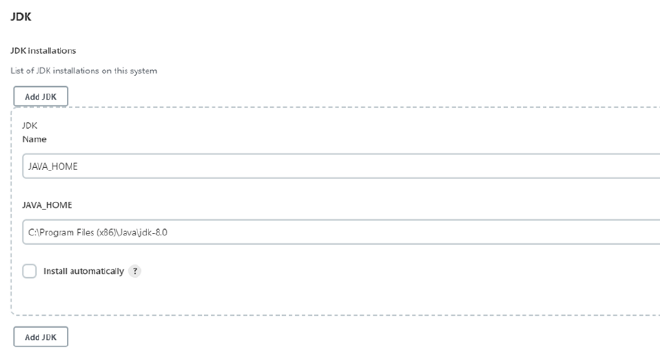
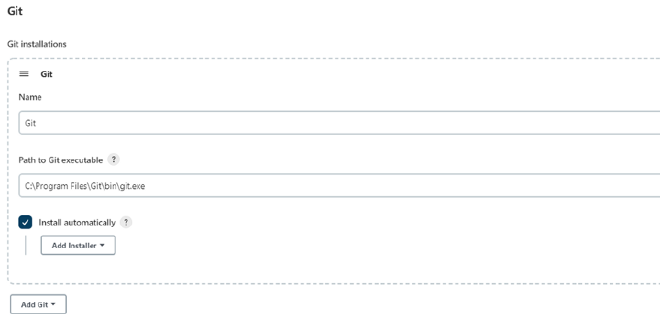
After this, we need to configure java, maven, git, and allure in Jenkins’s Global Tool Configuration. (You may skip which is not relevant to your project)
- Click on Manage Jenkins, Global Tool Configuration, and scroll to JDK. Click on “Add JDK”, uncheck “Install Automatically” and give JAVA_HOME path. You can take the java home value from your system’s environment variable.
- On the same page, scroll to Git, click on “Add Git” and paste the git path.
- Scroll to Maven and check the “Install automatically” checkbox. It will populate the latest Maven version.

- Scroll till Allure, and check the “Install automatically” checkbox. It will populate the latest Allure version.

Save the configuration and come to the Jenkins homepage.
Create a new Project in Jenkins #
Go to the Jenkins dashboard, and click on New Item. Enter the project name as desired and click on Maven project (If the project is not maven, then you may select freestyle) and click OK. The created project should be visible on Jenkin’s dashboard.
Setting up Bitbucket credentials under Jenkins’s project configuration #
-
Next, we need to add the BitBucket repo URL and credentials in Jenkins. In organizations, we always use a private repo.
-
Launch the Bitbucket URL where you have uploaded the code. Open the repo and click on the clone button. Copy from “https” till “.git”, like below
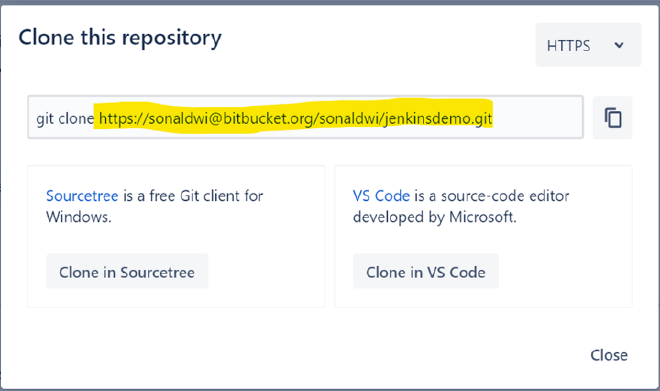
-
In Jenkins, click on the created project. Click on Configure-> Source Code Management-> Select Git radio and enter repository URL as “
”. In my case it is https://sonaldwi@bitbucket.org/sonaldwi/jenkinsdemo.git -
For entering credentials, click on the Add button under Credentials, click on Jenkins, and enter your Bitbucket’s username and password (recently for security purposes, Bitbucket has introduced an app password. So, make sure to enter the app password). If you are using a public repo you may skip this step.
-
Under “Branches to build” mention the branch which you have used in bitbucket.
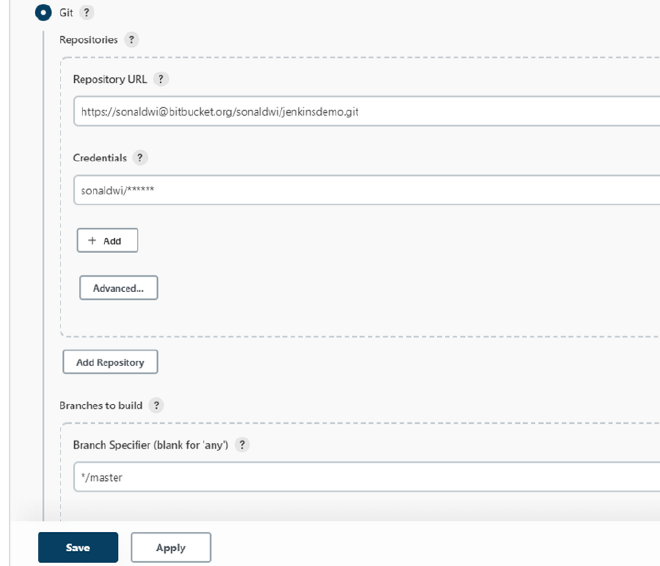
- Under the “Build Triggers” section, check “Build when a change is pushed to Bitbucket”.

With this, our configuration in Jenkins is done. Now we will create a bitbucket webhook which will actually trigger an automatic build in Jenkins as and when any update is pushed to the Bitbucket repo.
Create Jenkins webhook in Bitbucket repo #
-
Launch Bitbucket, and go to the “Repository Settings” page of your repo.
-
Click on “Webhooks” and click on “Add webhook”. Enter an appropriate title (Jenkins-webhook) and URL as “http://
/bitbucket-hook/”. (Make sure to add “/” at the end of the webhook.) -
Check “Skip certification verification” and let “push” be selected as the default selection in the Triggers section. Save it.

Running build manually in Jenkins #
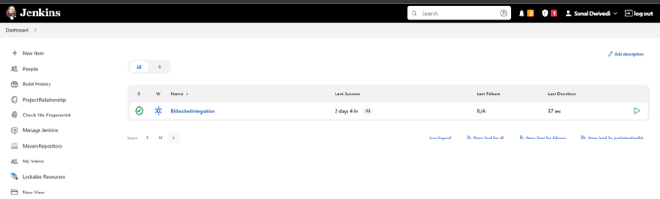
To test whether we are able to run manual jobs in Jenkins, go to the project created in Jenkins, and click “Build Now”.
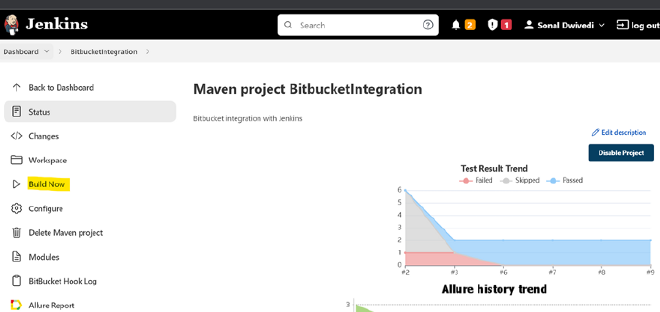
You will see that if there are no errors, a job would start running, and you can check the console logs by clicking on the latest build from the “Build History” section and clicking on “Console Output”
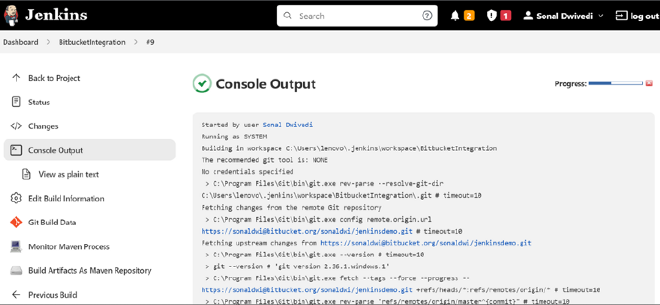
Checking out the Jenkins integration with Bitbucket #
Now to check whether our integration is proper, perform an update in your repo (for testing purposes, you can add a readme file/ blank file/ delete any file) and push the code to the Bitbucket repo.
After this, launch Jenkins and go to the project page from where you did the manual build process, and you should see a job running automatically since you made an update in Bitbucket.